PLDTmyDSL WiFi Router Admin Panel Password and Wifi Password

How to change Admin Password for PLDTmyDSL WiFi router.

1. plug your my DSL router in your PC/ Laptop via LAN then when status connected open your fave browser type this IP address 192.168.1.1 and a box pop out will request log in type this.

Default user with admin user
User Name: adminpldt
Password: 1234567890

Default user ONLY No admin access /Limited Access
User: admin
Pass: 1234


2. To Change Admin Panel Password, Click ADMIN then select password and select by click the dot the adminpldt root then your old password and new password then save.


3. To Change Wifi password click Network under the network click WLAN under the WLAN at right side Click Security under the security you see the PRE SHARED KEY put your password then click APPLY CHANGE after a few second your change will be success.

Fibr and Home Bro accounts

PLDT Fibr Huawei

User: telecomadmin
Password: admintelecom

Other account:
Username: admin
Password: admin

PLDT Home Bro Ultera

User: homebro
Password: homebro

This will mostly work on all PLDT myDSL issued modem like Zyxel, Speedsurf, Kasda, Huawei and other brands catered by the company. Login credentials also works on PLDT Home DSL and Fibr router page.

Tip: In case all of the credentials given above does not work on your PLDT router you can always call PLDT hotline to ask for assistance regarding your problem.

How To Verify Paypal Account Using Smartmoney Card

How To Verify Paypal Account Using Smartmoney Card
If you already have your Smartmoney card with you activated and loaded with atleast Php140, already linked to your Smart SIM or Smart account and your Smart Sim card is also loaded.

Why are your Smartmoney and Smart SIM have to be loaded? It is because upon verifying your Paypal account with Smartmoney, Paypal will charge your Smartmoney account to make sure that it is an active Smartmoney card which can be charged and can receive payments. Paypal will charge Php100 to your Smartmoney account.

Smartmoney card by default is locked from using for online transactions. To unlock it, you would need to go to the Smartmoney settings in your phone and there will be a Php2.50 charge to unlock it. That Php100 charge will be credited back to your Paypal account in a few days after the verification process is completed.

So here are the steps:

1. Log in you your Paypal account. Once you are logged in, your landing page is your account overview (see screenshot below). Click on "Get verified".
How To Verify Paypal Account Using Smartmoney Card
2. Apply the needed credit card (in this case Smartmoney) information. Provide all the Smartmoney card details such as your name and billing address (as it appears on your Smartmoney account), type of card (Mastercard) and the security code which is located on the back of the card. The security code is the last three digits you see there. For example if you see "6128 125", then the 125 is the code you need. Now before you click "continue", make sure that your Smartmoney account has been unlocked for online transactions which you will do on your phone. See step 3.
How To Verify Paypal Account Using Smartmoney Card
3. Unlock your Smartmoney account for online transactions. Again, you already have your Smartmoney card activated, loaded with funds and linked to your phone which is also loaded. Simply follow the menu below, take note that the arrangement of the menu may vary depending on the type of handset you have.

SIM menu >> Smartmoney >> Card management >> Transaction lock >> unlock >> Internet.

After you click on the "Internet" it will ask you the name of the card you want to make transaction. Simply select that card. Provide your PIN and wait for a text message confirmation that the Smartmoney card is ready for internet transactions. The last time I checked, this feature will only last for 10 minutes and after 10 minutes the Smartmoney will automatically be locked again from online usages. So see to it that you do it within that timeframe.

Now that you have received your confirmation message from Smart. You can now go ahead and click that "continue" button on Paypal. It will load and process the transaction, then a message will display, if it's successful you will know. You are not done yet.

4. Provide the four digit code from Smartmoney to your Paypal account. Remember I said that Paypal will charge your Smartmoney for Php100? You will also receive a text message confirmation from Smart about that transaction and that text message will contain the four digit code for that transaction. Get that 4-digit code because you will need to go back to your Paypal account and provide that code to complete the verification process. Paypal will say that the code may take up to several days to generate, that is for credit card accounts, I think. But for Smartmoney it is done the same day.

Once you provided it to your Paypal account, you're done.

If you have additional questions or suggestions, simply post it on the comments section below and we will talk about it. : )

You may also read my post about "How I Got My Smartmoney Card Right Away".

Linking Smart Money Card to Verify Paypal Account

Smart Money Master Card can be linked to Paypal. It can be used even if your Paypal balance is zero. Tested and works. Here’s how:


Apply for a Smart Money MasterCard. Go to nearest Smart Wireless Center its about 30 minutes you got your smart money card instantly.

Learn about the unlock features of Smart Money MasterCard for offline and online purchase. There are two types of unlock in Smart Money:

Unlock for Offline Purchase. Offline purchasing is unlocked by default. When your card is unlocked, you can use your Smart Money MasterCard for shopping at any store that accepts MasterCard. To check its status, go to Smart Money > Card Mgmt > Txn Lock > Check Status.

Unlock for Online Purchase. Online purchasing is locked by default. It needs to be unlocked before purchasing online. It automatically locks after 5 minutes.

Build some credit history by using your Smart Money MasterCard online and offline
Use your Smart Money offline. Use your card to buy in a grocery store. When your parents/friends go grocery shopping, offer to pay their bill using your Smart Money MasterCard and in return, let them pay you in cash.

Use your Smart Money online. Choose Pay by Credit Card. Dont forget to unlock it.

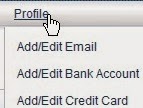
Login to Paypal and add your Smart Money MasterCard. Under Profile, choose Add/Edit Credit Card.

Make sure your Smart Money is unlocked for internet purchase before clicking Add Card. Paypal will charge $1 (non-refundable, converted to Peso) to your Smart Money MasterCard. Smart Money will send a text message:

Approval of Php 44.29 purchase at PAYPAL Merchant from card Card Name. Avail Bal: Php XXXX.00 Ref: 123456

Confirm your Smart Money MasterCard. Click Confirm My Card as shown below.

When you click Continue, Paypal will charge Php 100 to your Smart Money MasterCard to make sure its yours. Paypal send the unique 4 digit code that will show up on a text message that will be sent by Smart Money:

Approval of Php 100.00 purchase at PP*5465CODE Merchant from card Card Name. Avail Bal: Php XXXX.XX Ref: 123456

Enter the code. If successful, the Php 100 charge will be refunded back to your Paypal account in dollars.

Note: Unlock your Smart Money MasterCard first.


 How to Linking Smart Money Card to Verify Paypal Account
1. Get Smart SIM

If you have smart money, proceed to item #2, otherwise read on. You need to have a smart sim ( activate your smart money. You can either text MONEY to 343 or access it on your SIM menu, select Smart Money then activate account  Enter your desired PIN number or Go to nearest Smart Wireless Center you can get card instantly ). For details how, visit Smart Money page. You can also optionally apply for Smart Money card so you could use it to deposit funds from BDO, withdraw from ATM and use it for shopping.

2. Activate Smart Money

Linking Smart Money Card to Verify Paypal AccountOnce your Smart Money account is activated, unlock it now for online transaction. Again, access your SIM Smart Money menu from your cellphone. Select Smart Money, then Internet, choose Unlock (Some Smart Money users complaint they can't use it to link this account to PayPal, it's because they are not aware of that security feature from Smart which could be unlocked at will from your cellphone)

3. Add as Debit Card

Login to your PayPal and select Profile, then add/edit Credit Card. (see screen shot, forget the label used, technically credit and debit are both the same, except that debit is like a prepaid, while credit is like a postpaid). Take note though to have initial deposit of at least 200Php if you're going to have your PayPal account verified.

Social Networking Sites Top 15 Most Popular

Top 15 Most Popular Social Networking Sites | April 2012 Here are the

15 Most Popular Social Networking Sites as derived from our eBizMBA Rank which is a constantly updated average of each website's Alexa Global Traffic Rank, and U.S. Traffic Rank from both Compete and Quantcast. "*#*" Denotes an estimate for sites with limited Compete or Quantcast data. If you know a website that should be included on this list based on its traffic rankings Please Let Us Know.


1 | Facebook
2 - eBizMBA Rank | 750,000,000 - Estimated Unique Monthly Visitors | 2 - Compete Rank |2 - Quantcast Rank | 2 - Alexa Rank.
Most Popular Social Networking Websites | Updated 4/5/2012 | eBizM

2 | Twitter
13 - eBizMBA Rank | 250,000,000 - Estimated Unique Monthly Visitors | 24 - Compete Rank | 5 - Quantcast Rank | 9 - Alexa Rank.
Most Popular Social Networking Websites | Updated 4/5/2012 | eBizMBA
3 | LinkedIn
27 - eBizMBA Rank | 110,000,000 - Estimated Unique Monthly Visitors | 44 - Compete Rank | 23 - Quantcast Rank | 14 - Alexa Rank.
Most Popular Social Networking Websites | Updated 4/5/2012 | eBizMBA
4 | MySpace
84 - eBizMBA Rank | 70,500,000 - Estimated Unique Monthly Visitors | 51 - Compete Rank| 62 - Quantcast Rank | 138 - Alexa Rank.
Most Popular Social Networking Websites | Updated 4/5/2012 | eBizMBA
5 | Google Plus+
95 - eBizMBA Rank | 65,000,000 - Estimated Unique Monthly Visitors | *NA* - Compete Rank | *NA* - Quantcast Rank | *NA* - Alexa Rank.
Most Popular Social Networking Websites | Updated 4/5/2012 | eBizMBA
6 | DeviantArt
183 - eBizMBA Rank | 25,500,000 - Estimated Unique Monthly Visitors | 346 - Compete Rank | 74 - Quantcast Rank | 130 - Alexa Rank.
Most Popular Social Networking Websites | Updated 4/5/2012 | eBizMBA
7 | LiveJournal
303 - eBizMBA Rank | 20,500,000 - Estimated Unique Monthly Visitors | 605 - Compete Rank | 203 - Quantcast Rank | 102 - Alexa Rank.
Most Popular Social Networking Websites | Updated 4/5/2012 | eBizMBA
8 | Tagged
315 - eBizMBA Rank | 19,500,000 - Estimated Unique Monthly Visitors | 447 - Compete Rank | 217 - Quantcast Rank | 282 - Alexa Rank.
Most Popular Social Networking Websites | Updated 4/5/2012 | eBizMBA
9 | Orkut
350 - eBizMBA Rank | 17,500,000 - Estimated Unique Monthly Visitors | *NA* - Compete Rank | *NA* - Quantcast Rank | 156 - Alexa Rank.
Most Popular Social Networking Websites | Updated 4/5/2012 | eBizMBA
10 | CafeMom
451 - eBizMBA Rank | 12,500,000 - Estimated Unique Monthly Visitors | 127 - Compete Rank | 82 - Quantcast Rank | 1,144 - Alexa Rank.
Most Popular Social Networking Websites | Updated 4/5/2012 | eBizMBA
11 | Ning
456 - eBizMBA Rank | 12,000,000 - Estimated Unique Monthly Visitors | 617 - Compete Rank | 411 - Quantcast Rank | 339 - Alexa Rank.
Most Popular Social Networking Websites | Updated 4/5/2012 | eBizMBA
12 | Meetup
621 - eBizMBA Rank | 7,500,000 - Estimated Unique Monthly Visitors | 838 - Compete Rank | 516 - Quantcast Rank | 509 - Alexa Rank.
Most Popular Social Networking Websites | Updated 4/5/2012 | eBizMBA
13 | myLife
728 - eBizMBA Rank | 5,400,000 - Estimated Unique Monthly Visitors | 122 - Compete Rank | 391 - Quantcast Rank | 1,670 - Alexa Rank.
Most Popular Social Networking Websites | Updated 4/5/2012 | eBizMBA
14 | myYearbook
823 - eBizMBA Rank | 3,000,000 - Estimated Unique Monthly Visitors | 451 - Compete Rank | 285 - Quantcast Rank | 1,732 - Alexa Rank.
Most Popular Social Networking Websites | Updated 4/5/2012 | eBizMBA
15 | Badoo
952 - eBizMBA Rank | 2,500,000 - Estimated Unique Monthly Visitors | 1,596 - Compete Rank | 1,148 - Quantcast Rank | 112 - Alexa Rank.
Most Popular Social Networking Websites | Updated 4/5/2012 | eBizMBA

How to install/change XML template on new interface in blogspot/blogger

Here are the steps to apply or change the template for your current blog

Step 1. Login to the blogger using your blogger login id

How to install/change XML template on new interface in blogspot/blogger

Step 2. Click on template link on the left hand side of the blogger page
How to install/change XML template on new interface in blogspot/blogger

Step 3. Go to extreme end of the page and click on Backup/Restore Template link
How to install/change XML template on new interface in blogspot/blogger


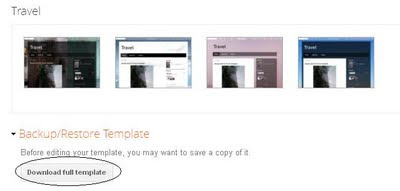
Step 4. Backup the current template. This is very important so you can always go back (click on the screenshot to the left to see exactly how this is done).

How to install/change XML template on new interface in blogspot/blogger

Step 5. Browse for the new template xml and press upload button
How to install/change XML template on new interface in blogspot/blogger

How to edit HTML (Editor) on new blogger interface?

Step 1. Login to the blogger using your blogger login id

Step 2. Click on template link on the left hand side of the blogger page

Step 3. Go to extreme end of the page and click on Backup/Restore Template link

Step 4. Backup the current template. This is very important so you can always go back (click on the screenshot to the left to see exactly how this is done).

Step 5. Click on Edit Template link and this will open the HTML window. Make necessary changes to the HTML and click on Save Template button.
How to install/change XML template on new interface in blogspot/blogger

How to Write the Perfect Resignation Letter

How to Write the Perfect Resignation Letter
By Farhan Shah

Most people in their lives come to a point in their careers where they will want to resign from their current company. The reasons might be extremely varied, but the intentions are the same. However, this occurrence happens so rarely in one’s career that when you do reach that point, you’re stumped as to what you should do next.

One of the most essential, yet often overlooked, steps in the resignation process is the resignation letter. An expertly-handled resignation means that you’ll leave the company on good terms and leaves the door open in the event that you do choose to return as an employee.
While you’re contemplating the best time to tell your boss that you’re resigning, here are 7 guidelines to keep in mind while you’re penning your resignation letter.

• Resignation letters should ideally only be a page in length.

• Submit a printed hardcopy of your resignation letter instead of emailing it. Besides being more professional, it gives you and your soon-to-be ex-company physical evidence in case of any possible disputes that might arise.

• Do not include any derogatory or negative comments in the resignation letter. Even if you’re dying to tell your boss what a self-righteous prick he or she is, explicitly writing it in the resignation letter will not only make you look unprofessional, it might even land you into legal trouble.

• The resignation letter should include a brief explanation of why you are leaving the company. However, keep in mind the previous guideline, especially if the main reason why you’re quitting is because your boss is a self-righteous prick.

• It is good etiquette in the letter to thank your employer and boss for the opportunities that you’ve been given in the company.

• Do take note that most companies require you to serve notice ranging from a few weeks to even two months. This is important in the event that you already have a new job offer lined up. Communicate with your new employers the amount of notice you need to give and include the exact date of when you are resigning from your current company in your resignation letter. Remember to fulfil your mandatory notice period and ensure that it does not clash with the start date of your next job.

• If you would like a testimonial from your boss, it is best to ask from it in person rather than requesting for it in the resignation letter. However, keep in mind that your boss is not obligated to give you one, so don’t hound him or her.

Format
YOUR NAME
YOUR HOME ADDRESS
MANAGER’S NAME
MANAGER’S TITLE
MANAGER’S COMPANY ADDRESS
Dear MANAGER’S NAME,

First paragraph
The first paragraph is a formal announcement of your resignation from the position. Indicate your last day of work, bearing in mind the notice period required.

Second paragraph onwards
From the second paragraph, you can include your reason for leaving the company and offer an appreciative note for everything the company has done for you.

Final paragraph
In the final paragraph, offer your assistance and ask how you can help during the transition period.


Sample
Isaac Lim
64B Labu Road
Singapore 1234564
Man Ah Jer
Managing Editor, The Magazine Company
Fusionosite, #08-08
Singapore 987621

Dear Man Ah Jer,

Please accept this letter as notification that I am resigning as Editor of The Magazine Company, effective 4th April 2011. My last day of service with the company shall be on 29th April 2011.

I am resigning to pursue other career options in a different industry, and am thankful for all the opportunities that have been given to me over the past three years in The Magazine Company. My role as Editor has helped me to mature professional and personally, and I would like to express my gratitude for all your guidance.

If I may assist during the hiring process and the transition period, I am more than happy to do so while serving my notice and for a period of three weeks after that.
Thank you and I wish The Magazine Company continued success.


Sincerely,
Isaac Lim

--
For a complete career toolbox with formats and examples of the different correspondences you might need to write, check out JobsCentral’s comprehensive career resource page that contains samples of resumes, cover letters, and much more.

Link: http://community.jobscentral.com.sg/toolbox/

Auto Share On 35 Social Networks

When you add a new post to your blog you want to update your friends and followers on Social Networks and Social Bookmark sites.The more sites you share your latest post on the more visitors you get to your blog but updating lots of sites often takes longer than writing the post in the first place.

That's were ping service Ping.Fm comes in.Ping.Fm can automatically update 35 social network and bookmarking websites with one click.So when you publish your latest post you can auto update Facebook, Facebook Pages, Twitter, Google Buzz, Myspace, LinkedIn, Posterous, Delicious and more..

Auto Share And Manual Share

You can auto share on as many of the services as you like and even set up groups to Ping selected sites with different links.I would suggest connecting the services you are already a member of like Twitter and Facebook and joining the others and connecting them.This way your Blog is 'Pinged !' to over 30 sites every time you publish.

You can add one Blog Feed to auto share in the tools section and share to all services with one click from your dashboard.Also Ping.Fm have an extension for Firefox to allow you to ping with one click, personally i added the Ping.fm button to the Google Toolbar and find it the quickest.
Screenshot

See How Ping.Fm has updated my Facebook page below :
Here is the link to go to Ping.Fm and take the work out of sharing your posts.Currently Delicious are changing their connection service so you may not be able to connect but all others are ready to roll.

Let us know your opinion of Ping.Fm and don't forget to come back and Ping Us !
Posted by cris at 5:49 AM 0 comments

How to Submit Sitemap to Yahoo Ask Bing Google

One of the most asked questions by new Bloggers is 'How Can I Get My Blog Listed On Google ?'.Yet many new Bloggers and even some of the experienced Bloggers make no attempt to get their Blogs listed on the other three main search engines namely Yahoo, Bing and Ask.Google is the big guy in search but Yahoo, Bing and Ask have a loyal user base and return millions of search results daily, it makes sense to get your blog listed in those results.We previously seen how you can Submit 2 sitemaps to Google and in this post i will show you how to generate a XML sitemap for your blog and submit it to Yahoo, Bing and Ask.By submitting a sitemap you are sending all your blogs content directly to each search engine to be crawled and indexed.The tutorial has two sections, first we will create the XML sitemap and then we will 'Ping' it to each search engine.
Submit Sitemap To Yahoo, Bing and Ask

Create XML Sitemap
Step 1. There are a number of sites that allow you to create a free XML sitemap.Here i will use xml-sitemaps, To Generate your fee sitemap go to www.xml-sitemaps.com

Step 2 . Scroll To The Sitemap Generator And Enter Your Blogs URL.You don't need to change the other fields just click the start button.
Step 3. Your sitemap will now be created it may take a few minutes.Once created you will get a list of available links you need to get the .XML link to submit.To do this 'Right Click' on the top link and copy the link.

Ping Your Sitemap To Search Engines

Each search engine has a Ping URL you can use.Copy each URL below into your browser and replace SITEMAP-URL-HERE with your sitemap then enter to submit.

Note - Sitemap URL should end in .XML
Example - http://www.xml-sitemaps.com/download/www.yourblog.com/sitemap.xml

Yahoo
http://search.yahooapis.com/SiteExplorerService/V1/updateNotification?appid=SitemapWriter&url=SITEMAP-URL-HERE?redirect=false

Bing
http://www.bing.com/webmaster/ping.aspx?siteMap=SITEMAP-URL-HERE

Ask
http://submissions.ask.com/ping?sitemap=SITEMAP-URL-HERE

New Ask
http://submissions.ask.com/ping?sitemap=http://www.YourWebSite.com/sitemap.xml

Once you submit each sitemap you will get a message confirming the submission.That should help get your blog indexed and returned in Yahoo, Bing and Ask search.
Posted by cris at 6:02 AM 0 comments
Email This
BlogThis!
Share to Twitter
Share to Facebook

Get More Search Traffic To Your Blog Submit 2 Sitemaps To Google

If you want to get more hits to your Blog making your blog 'search engine friendly' is an absolute must.Sitemaps basically show Google search bots you recent activity quicker and without the bells and wistles than can cause crawl errors (Dirthy words to a blogger).

Im always trying to provide better tips and improve the tutorials when possable and this post has been updated from the original to include a second sitemap.Why? The first sitemap only contains your 26 most recent posts ! If you have more than 26 posts they are not indexed.You should still add both sitemaps, the more the better.

There is a number of ways to generate a sitemap for blogs and websites, here on blogger generating a sitemap and submitting it to Google can be done in 5 minutes and can be achieved by even the least experienced Blogger.

What Is A Site map ?

"Site maps can improve search engine optimization of a site by making sure that all the pages can be found. This is especially important if a site uses a dynamic access to content such as Adobe Flash or JavaScript menus that do not include HTML links.

They also act as a navigation aid by providing an overview of a site's content at a single glance.

Most search engines will only follow a finite number of links from a page, so if the number of links is very large, the site map may be required so that search engines and visitors can access all content on the site"
(source :Wikipedia)

We have 3 sections to complete this tip

1. Getting your sitemap address

2. Submitting your blog to Google webmaster tools

3. Submitting your Sitemap to Google webmaster tools

So lets see how its done :

Sitemap 1.
I will show you how this is done for future reference.

Getting the sitemap address

Step 1.
Go to your blog and look at your blogs address in the browser at the top of the page it will be :
http://www.YOURBLOGNAME.blogspot.com/
or if you have a custom domain :
http://www.YOURBLOGNAME.com/

Step 2.
Add the following to the end of your blogs URL :
robots.txt
So now you have :
http://www.YOURBLOGNAME.blogspot.com/robots.txt
http://www.YOURBLOGNAME.com/robots.txt
Click enter or go to go to the address

Step 3.
Now once you go to this page it will look like this :

User-agent: Mediapartners-Google
Disallow:

User-agent: *
Disallow: /search

Sitemap: http://www.YOURBLOGNAME.blogspot.com/feeds/posts/default?orderby=updated

Mine looks like this :

User-agent: Mediapartners-Google
Disallow:

User-agent: *
Disallow: /search

Sitemap: http://www.YOURBLOGNAME.blogspot.com/feeds/posts/default?orderby=updated

Above as i have highlighted in red is your site map address - that's it as far as getting the site map.
Keep this you will need it later.

Sitemap 2.
I will just give you the default 'atom 500' address :
atom.xml?redirect=false&start-index=1&max-results=500

Now you can Submit your site map to Google.

Submitting your blog to Google webmaster tools

Step 1.
If you do not already have a webmaster tools account to do this you go to www.google.com/webmasters/tools/ you can log in to webmaster tools with your Google account the same details you log into blogger with.

Webmaster tools is a Great source of information to see exactly how Google sees your blog but that's another days work..

Step 2.
On the homepage if you have not already submitted your site to webmaster tools click 'Submit A Site' .
You can submit your blog URL.Note: just submit your URL here http://YOURBLOGNAME.blogspot.com we enter the site map address later.

You will have to verify that you own the blog this is straight forward follow the steps provided by Google.

For mor help adding your site click here

Once you are verified as the owner of the blog we can carry on.

You are now ready to submit your sitemap.

Step 1.
Submitting your Sitemap to Google webmaster tools

Click on your blog address in your webmasters dashboard you will arrive on this page.In the left sidebar click 'site configuration' as shown below ::
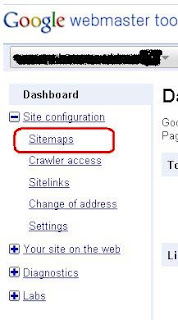
Now in the drop down click 'sitemaps' as below :

Before we finish : If you need more help or have an opinion or suggestion Please leave a comment Below. This is a Do-Follow Blog leaving a comment will also help your blogs Google rank.
Click 'Submit Sitemap' as circled in red below and enter the site map you generated earlier:
feeds/posts/default?orderby=updated
As you can see circled in blue below your URL is already there so just type or paste in : feeds/posts/default?orderby=updated


Click submit.

Now enter the second sitemap :
atom.xml?redirect=false&start-index=1&max-results=500

Click submit.

Your sitemaps have been added and the Google bots are heading your way.Why not now Submit A Sitemap To Yahoo.

breakdown of impressions, clicks, CTR, Avg CPC and eCPM

Impressions
An impression occurs when your site is served an ad and the user is able to view it. So, for example, if one user is able to see three Chitika ads on your page, you will receive 3 impressions.
Another example – say that you have 100 users visit your page on a given day, but only 80 of them are visiting from a country that can see Chitika ads. This would result in 80 impressions.

eCPM

For beginners, eCPM can be a confusing stat. It is simply a way to track ad performance – it means “effective cost per mile (thousand impressions).” In simpler terms, it is the amount you are paid per 1,000 impressions. This is also very helpful when comparing channel performance.
Let’s say that on one channel you received 550 impressions and received $1.25 in total revenue. The other channel received 125 impressions and $0.55 in revenue. To compare the channels, you would use eCPM. The first channel’s eCPM is $2.27, and the second’s is $4.40. So, even though you earned more with the first channel, the second one actually performed better comparatively.

Revenue

As a publisher, isn’t this the point of having ads on your page? Therefore, I’m sure you all know what this stat mean$. :)
all kinds of support questions on a daily basis here at Chitika. Today he was gracious enough to share 3 important questions that ALL types of Chitika users could benefit from.

What’s the difference between an “impression” and a “page view”?
“You may see these two terms used often and different contexts. While they have similar meanings, it’s the context that makes the difference. Page views are a measure of website traffic. In this context, the term page view represents every time a page from your site is requested by a visitor. If you have three visitors that each request five pages, this will result in fifteen page views for your site.
Impressions are a measurement of the number of ads that are shown on your site. An impression occurs any time an ad unit is displayed. If you have two Chitika ad units on your page and five users request the page, the result will be ten ad impressions since the five users each saw two ad units.”
Are “unique IP addresses” the same as “unique visitors”?
“An IP address is a basically just a numeric pointer for computers and servers on the internet to be able to find each other. For example, if you type “www.Chitika.com” into your web browser, your computer and our servers know how to talk to each other based on this numerical IP address. Therefore, when you look at the number of unique IP addresses accessing your web site, what that loosely means is the number of different machines requesting information from your site.
The area where these two terms are blurred is when either a user accesses your site from multiple machines on separate IP address – for example, at work and at home. In this case, the number of users and IP addresses are both two, but there is actually only one unique visitor. On the other hand, a home or business could have a network that uses only one IP address on the internet. In this case, if two people from inside the network access your site, the unique IP address count would only be one, but the unique visitor count should be two. Generally, web statistics are reported in unique visitors, though this number is a highly-refined estimate.”
 breakdown of impressions, clicks, CTR, Avg CPC and eCPM
“As explained previously, an impression is counted anytime an ad is displayed to your visitor. This may happen multiple times per page view if there are multiple ad units on a page. A click is a fairly easy unit of measurement – a click occurs when your user clicks on your ad. CTR or click-through-rate is the percentage of your impressions that garner clicks. For example, if your site has 1,000 impressions in a day and results in 10 clicks, you would have a 1% CTR.
Average CPC or cost-per-click is the average amount that you are paid per click generated from the ad units on your site. This number is represented as an average of the CPCs that you get on each click for each day. Specific CPC values can fluctuate depending on the market and having the average of these values helps to illustrate the overall trends of the CPCs generated for your ads.
eCPM or effective cost-per-thousand impressions (the M is for the roman numeral M meaning 1,000) is a unit designed to help normalize the performance of a CPC ad unit. On a simple level, this number represents the amount revenue you would generate for 1,000 impressions based on your current CTR and CPC. As an example, if you had 1,000 impressions at a 2% CTR you would generate 20 clicks. If your average CPC was $0.20 for those clicks, you’d earn $4 on those 1,000 impressions – a $4.00 eCPM.”

How to Verify Paypal using RCBC myWallet VISA CARD?

How to Verify Paypal Using RCBC myWallet Visa Card

Paypal is one of the secure payment for me that why eBay to their payment method because they believe that Paypal is the most secure payment method online. When you are newbie in online money making, as you observe mostly of them sent the payment to Paypal.

How to Verify Paypal using RCBC myWallet VISA CARD?

When they register to Paypal.com, they are afraid because after they fill-up the profile information. Paypal actually ask for a credit card information. But they can actually skip adding credit card information and add later on if you have one.

One you have money on your Paypal account, of course you want to get the money you've saved on Paypal. Remember you need to have verify your Paypal account to withdraw the money on your account.

When the time you want to withdraw the question to be asked on your self is "How to Verify Paypal?". Some online money maker uses the EON card especially in Philippines. But now I would like to introduce the RCBC myWallet VISA CARD. Now you would ask, "How to Verify Paypal using RCBC myWallet Visa Card".

What is the advantage of RCBC myWallet VISA CARD?
How to Verify Paypal using RCBC myWallet VISA CARD?
Actually, they are just the same in terms of functions but the advantage is that RCBC myWallet VISA card is cheaper than UnionBank EON VISA CARD. Since you will pay for 350 for the annual fee for EON VISA CARD while RCBC myWallet VISA CARD is just to pay 110php.

How to get RCBC myWallet VISA CARD?
Before I give you the details on how to verify your paypal using RCBC myWallet VISA CARD. We should have our own RCBC myWallet VISA CARD.

1. First, go to the nearest RCBC Commercial Bank.
There are two RCBC bank - 
a) RCBC Savings bank;
b.) RCBC Commercial Bank.

2. Fill-up the form given by teller and give a 1 VALID ID(original and photocopy) but they mostly needed the photocopy while original is for verification. List of VALID IDS,OTHER VALID IDS

3. Wait for the card to release after several minutes (depends on the bank)

4. You're done! You have your own RCBC myWallet VISA CARD

When you have the RCBC myWallet VISA CARD, of course you need to verify your paypal account using the RCBC myWallet VISA CARD to withdraw the money on your Paypal. Take a look on your balance(online or ATM machine), your balance is 100php since only 10 is being charge for the card.

How to Verify Paypal using RCBC myWallet VISA CARD?
1. Wait for 24 hours after you get the card to activate your card
2. After 24 hrs, you can deposit 50 pesos to verify paypal since you already have 100 on your account.
3. Then, go to your paypal account
4. Add Debit/Credit card
5. Put the details asked like First and type of the card
6. Select VISA for the type of the card
7. Add the card number(number at the front of the card), expiration date and the Card verification number(refer to the back of the card) and the billing address. Card Verification number is the last 3-digits on the back of your card. Be sure the billing address in paypal is the same as you apply for RCBC Visa Card

8. They will deduct 100php in order to verify that the card is yours. You card is now link to paypal but not yet verified, all you need to is to call the RCBC hotline to give the verification code for paypal. or you can email them. Go to http://www.rcbc.com/rcbc_contact.php and use this format in sending them emails to get your verification code.

Full Name:
16-digit Card number:
Issuing branch:
Birth date:
Phone No.:
Mobile Phone No:
Address:
Date of linking card with PayPal:
Email Address indicated during account opening:

After 1day, they email to you the code.
9. Log-in to your paypal account, copy the code and paste the paypal verification code given. Then you’re done. you will recieve a paypal bonus which is the amount they deducted from your EON account. So basically, you would get you 100 pesos back.

10. Now, you're Paypal account is verified! Congratulations

So therefore, you just paid 10 pesos all in all. Get your RCBC myWallet VISA CARD now and get verified!

As of now, I already withdraw the money using my RCBC myWallet VISA CARD. The card can be used to restore the limited access account of Paypal. That what happen to my paypal account before it get verified by RCBC myWallet VISA CARD.

I would like to add that only 10php is deducted every transaction of paypal to rcbc card. Sample, you withdraw 7330php to you card. Since they will deduct 10php, expectedly you will get 7320php.

Remember, Paypal will deduct 50php if you withdraw below 7000php and free if above 7000php. Sample, you withdraw only 4100php. Expectedly you will receive 4040 since you 50php for paypal and another 10php for paypal to rcbc account.


Withdraw PayPal via Bank Account
Bank Names
Bank Code
ALLIED BANKING CORP
010320013
ASIA UNITED BANK
011020011
BANCO DE ORO (& EQUITABLE PCI BANK)
010530667
BANGKO SENTRAL NG PILIPINAS
010030015
BANK OF AMERICA
010120019
BANK OF CHINA
011140014
BANK OF COMMERCE
010440016
BANK OF THE PHIL ISLANDS (BPI)
010040018
CITIBANK N.A.
010070017
EAST WEST BANK
010620014
EXPORT & INDUSTRY BANK
010860010
LANDBANK OF THE PHILS
010350025
METROPOLITAN BANK & TRUST CO
010269996
PHIL NATIONAL BANK (PNB)
010080010
PHIL TRUST COMPANY
010090039
PHIL VETERANS BANK
010330016
PRUDENTIAL BANK
010150018
RIZAL COMML BANKING CORP (RCBC)
010280014
SECURITY BANK & TRUST CO
010140015
UNION BANK OF THE PHILS (UBP)
010419995
UNITED COCONUT PLANTERS BANK
010299995